| |
|
|
| |
Getting the best from your indicator
Wed 7th July, 2010
|
|
|
|
Most tackle shops sell pre-treated indicators and they come in all sorts of colors and sizes. Some of them are a little on the large size and you will probably have to cut them down.
To achieve a neat cut I use a half inch long section of garden hose which I split allowing the ends to overlap. After combing the indicator with a fine wire pet brush push it through as shown and squeeze the hose around it…then cut off the excess yarn with a sharp scissors.
I prefer to make my own and one of the best yarns that I have come across is available from Peter at Taupo Tiger Imports. Email: taupotiger@xtra.co.nz. Pete stocks it in various colors but the most useful overall seems to be the Tan. I don’t know if the dying process in the other colors affects the fibers or if its a different material but this particular color has proved to be durable and when treated properly will out float and out last any other indicator that I have ever made.
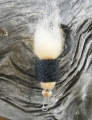
Personally I like neutral colors and when made up the tan indicator looks just like a piece of pumice floating down river.
Which is fantastic…as long as there is no pumice actually floating past!
The important thing with any indicator is to water-proof them properly and the easiest way is to use Selleys Water Shield or a similar product. Whether they are home made or shop bought comb them out and trim them if necessary. Then pop them three at a time into a small sealable plastic bag keeping them separate inside it. Give them a few squirts with the water-proofer and re-seal the bag. Do this well in advance because Selleys has to cure to be effective… usually overnight.
Don’t be tempted to treat them with silicon spray because it doesn’t work! The cheaper sprays especially have a high water content which just saturates the indicator. It also leaves the yarn covered in a film which attracts dirt and clogs up the fibers making them next to useless. |
|
|
|
|
|
| Back to Top |
|
|
|
| |
|
|
|